# How to access Windows through the console and RDP?

This guide will show how to create an instance and then access Windows using the Ace Cloud console and RDP from scratch.

**a.** To create an instance and set a Windows password, follow the steps below:

**Step 1:** [Login](https://customer.acecloudhosting.com/index.php?m=ace_product_register_addon\&action=login) to your account.

<figure><img src="/files/SuGGsszeY5wGZUJgQpxx" alt=""><figcaption></figcaption></figure>

**Step 2:** Navigate to **Compute** and then click on **Instances**.

<figure><img src="/files/f5z8YJ3tIJHAUi0AxC3e" alt=""><figcaption></figcaption></figure>

**Step 3:** Click on **Create Instance**.

<figure><img src="/files/vs24wlCtBWTu029bjFwo" alt=""><figcaption></figcaption></figure>

**Step 4:** Enter the instance details and hit **Next**.

<figure><img src="/files/lbBHCPGMgSbOqE7vCip3" alt=""><figcaption></figcaption></figure>

**Step 5:** Click on **Source**, then select **Image** from the **Boot Source** drop-down menu.

<figure><img src="/files/Uk1EeB9330lVhoXnJbT8" alt=""><figcaption></figcaption></figure>

**Step 6:** Select **Image Type** as **Windows Image** from the menu.&#x20;

<figure><img src="/files/yXsJhLdzufLvtMOZ4TVE" alt=""><figcaption></figcaption></figure>

**Step 7:** Select **Window-Server-2022** and select **Flavor.** Click on **Next.**

<figure><img src="/files/xfssbHs8qmBdzzd00tyW" alt=""><figcaption></figcaption></figure>

**Step 8:** Choose a network of your own choice.

Select the **Security Groups** and click **Next**. (You can also create a security group. Click [here](/knowledge-base/network/how-to-manage-a-security-group.md) to learn how.)&#x20;

<figure><img src="/files/1RRveuiutQULKA8EmA0G" alt=""><figcaption></figcaption></figure>

**Step 9:** Review your details and click on **Launch Instance.**

<figure><img src="/files/qB7e31RSncIOgv1p3G5J" alt=""><figcaption></figcaption></figure>

**Step 10:** From the left-hand side menu, select **Networks** and click **Security Group**.

<figure><img src="/files/EF1GxkbBa8TWtmPWuj9H" alt=""><figcaption></figcaption></figure>

**Step 11:** Click on the **Security Group name**.

<figure><img src="/files/Bgax4337t5ehpamdsYXJ" alt=""><figcaption></figcaption></figure>

**Step 12:** Click on **Inbound Rules** and then select **Create New Rule**.

<figure><img src="/files/1WkgVYYgbJ8JSt7XVhWk" alt=""><figcaption></figcaption></figure>

**Step 13:** Select **RDP as Rule**, fill in the required details, and click on **Submit**.

<figure><img src="/files/xuSWXhkHfZmeNiIG0w8b" alt=""><figcaption></figcaption></figure>

**Step 14:** If you have chosen a private network in **Step 10,** assign a **Floating IP** to your instance. Click [here](https://docs.acecloudhosting.com/knowledge-base/v/compute/how-do-you-associate-disassociate-floating-ip-in-an-instance) to learn how to assign a Floating IP.

**Step 15:** Click on the instance name.

<figure><img src="/files/VyUg25NwAx6wMLx1rR74" alt=""><figcaption></figcaption></figure>

&#x20;**Step 16:** Click on the **Console** tab.

<figure><img src="/files/U9e2gSSHSR0081ZN1VUM" alt=""><figcaption></figcaption></figure>

**Step 17:** Select basic details to set up Windows and click **Next**. &#x20;

<figure><img src="/files/N8fIxzJEUnn6rZdKlw5X" alt=""><figcaption></figcaption></figure>

**Step 18:** Click **Accept** to agree to the license terms. &#x20;

<figure><img src="/files/BukbNHTtJV48LdCtos76" alt=""><figcaption></figcaption></figure>

**Step 19:** Set your **Password**, re-enter the password, and click **Finish**.&#x20;

<figure><img src="/files/iv6sHMHAm0g45fx3bcp3" alt=""><figcaption></figcaption></figure>

**b.** To access Windows through the console, follow the below steps:

**Step 1:** Click **Send CtrlAltDel** on the top-right corner. &#x20;

<figure><img src="/files/lXT9SHmj63eXGuBbNk5P" alt=""><figcaption></figcaption></figure>

**Step 2:** Enter the set password and click on the arrow button.

<figure><img src="/files/zSalkvfkDXBqr3kP2f8J" alt=""><figcaption></figcaption></figure>

**Step 3:** Select **Yes** for your network setting.  &#x20;

<figure><img src="/files/xcPrdEzpbkdNbQQrpl3w" alt=""><figcaption></figcaption></figure>

**Step 4:** Your window activation will start.&#x20;

**Note:** Please do not close the terminal. &#x20;

<figure><img src="/files/eQfutvhJWbZxMCEZPIEW" alt=""><figcaption></figcaption></figure>

**c.** To access windows through the RDP, follow the below steps:

**Step 1:** Copy the IP address of your instance.&#x20;

<figure><img src="/files/PxeDMiN4TvoOSbPc1mGS" alt=""><figcaption></figcaption></figure>

**Step 2:** Open the **Remote Desktop Connection** app on your system.

<figure><img src="https://customer.acecloudhosting.com/index.php?rp=/images/kb/345_2022-09-19-16_46_51-Window.png" alt=""><figcaption></figcaption></figure>

**Step 3:** Click on **Show Options.**&#x20;

<figure><img src="https://customer.acecloudhosting.com/index.php?rp=/images/kb/347_MicrosoftTeams-image-18.png" alt=""><figcaption></figcaption></figure>

**Step 4:** In the computer dialogue box, type the **IP address**, enter **Administrator** as the username, and click **Connect**. &#x20;

<figure><img src="https://customer.acecloudhosting.com/index.php?rp=/images/kb/348_MicrosoftTeams-image-19.png" alt=""><figcaption></figcaption></figure>

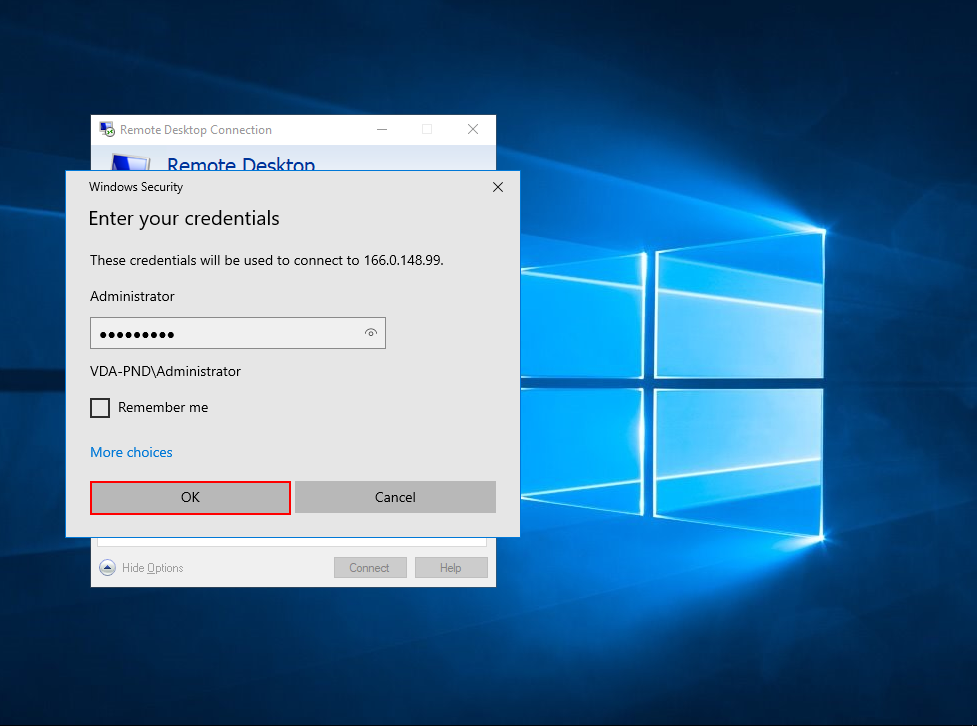
**Step 5:** Enter your password and click **OK**. &#x20;

<figure><img src="https://customer.acecloudhosting.com/index.php?rp=/images/kb/349_MicrosoftTeams-image-20.png" alt=""><figcaption></figcaption></figure>

**Step 6:** Click **Yes** to continue and access your Windows.

<figure><img src="https://customer.acecloudhosting.com/index.php?rp=/images/kb/350_MicrosoftTeams-image-21.png" alt=""><figcaption></figcaption></figure>


---

# Agent Instructions: Querying This Documentation

If you need additional information that is not directly available in this page, you can query the documentation dynamically by asking a question.

Perform an HTTP GET request on the current page URL with the `ask` query parameter:

```
GET https://docs.acecloud.ai/knowledge-base/compute/how-to-access-windows-through-the-console-and-rdp.md?ask=<question>
```

The question should be specific, self-contained, and written in natural language.
The response will contain a direct answer to the question and relevant excerpts and sources from the documentation.

Use this mechanism when the answer is not explicitly present in the current page, you need clarification or additional context, or you want to retrieve related documentation sections.